
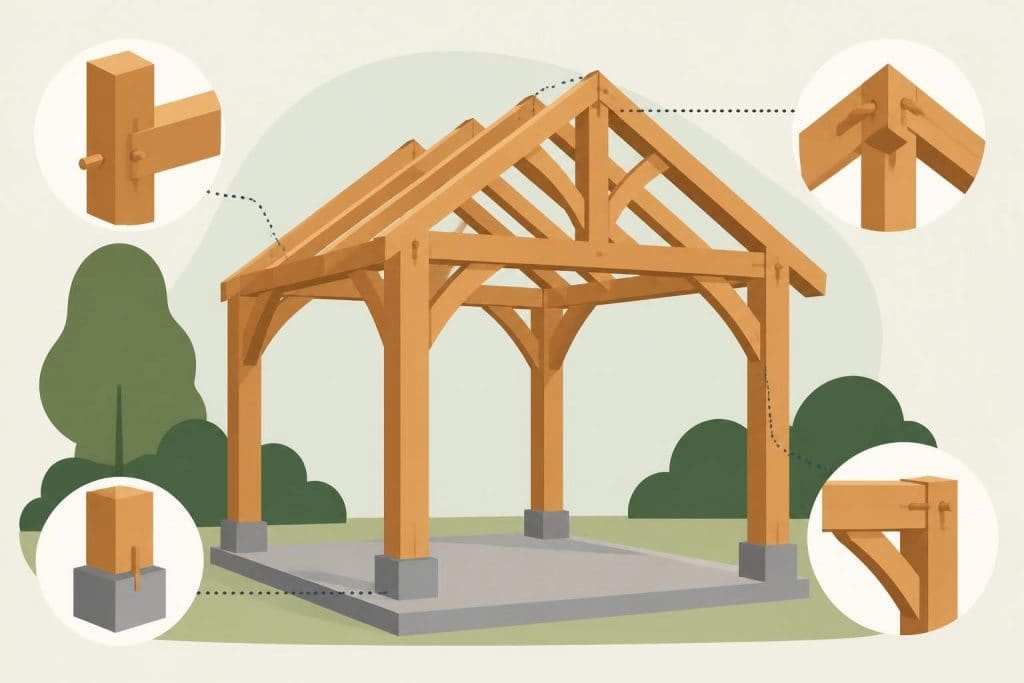
Building a wooden frame shed represents an excellent opportunity to create functional outdoor storage whilst adding character to your property. Whether you require additional space for gardening equipment, workshop facilities, or general storage, a well-constructed timber frame structure delivers durability, aesthetic appeal, and long-term value. The construction process involves careful planning, quality materials, and proven techniques that ensure structural integrity for decades to come. This comprehensive guide explores the essential aspects of designing and building a wooden frame shed, from foundation preparation through final assembly.
Understanding Timber Frame Shed Construction
A wooden frame shed differs fundamentally from prefabricated alternatives through its bespoke construction method and superior structural qualities. Traditional timber framing employs mortise and tenon joints, oak pegs, and carefully selected timber to create a framework that withstands the British climate whilst maintaining architectural beauty.
The primary advantage of this construction approach lies in its longevity. When properly maintained, a timber frame structure can last centuries rather than decades. The natural properties of oak timber provide inherent resistance to decay, whilst the framework's design allows for natural movement and settling without compromising structural integrity.
Key Components of the Frame
The structural system comprises several essential elements working together harmoniously:
- Posts: Vertical members that transfer loads to the foundation
- Beams: Horizontal members connecting posts and supporting the roof structure
- Braces: Diagonal members providing lateral stability and preventing racking
- Rafters: Sloped members forming the roof profile and supporting the roof covering
- Wall frames: Secondary framing between posts for cladding attachment
Understanding timber used in construction helps in selecting appropriate species and grades for each component. Oak remains the premium choice for primary structural members, whilst other softwoods may suffice for secondary framing elements.
Planning Your Wooden Frame Shed Project
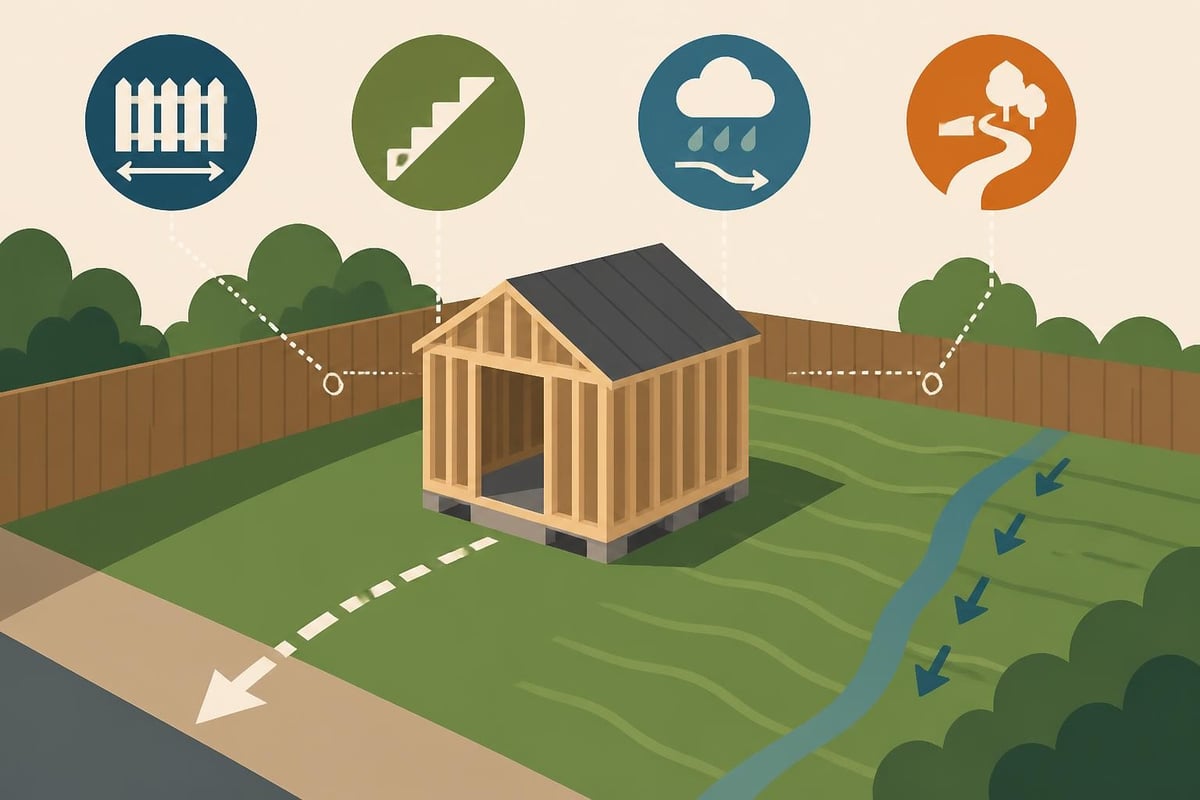
Successful shed construction begins long before the first timber is cut. Planning permission, building regulations, and site preparation require careful consideration to avoid costly mistakes.
Regulatory Requirements and Permissions
In the UK, most garden sheds fall under permitted development rights, though restrictions apply. Generally, structures under 2.5 metres in height located more than 2 metres from boundaries require no planning permission. However, sheds exceeding 15 square metres in floor area may require Building Regulations approval, particularly if positioned within 1 metre of boundaries.
Several factors influence whether formal approval becomes necessary:
- Total garden building area: Combined outbuilding footprint must not exceed 50% of garden area
- Height restrictions: Maximum eave height of 2.5 metres for buildings within 2 metres of boundaries
- Listed buildings: Additional restrictions apply in conservation areas or listed properties
- Intended use: Commercial use or habitable rooms trigger different requirements
Consulting local planning authorities before commencing construction prevents future complications. The Living etc guide on garden shed mistakes highlights common oversights that lead to planning issues.
Foundation and Base Construction
The foundation system critically influences the longevity and performance of any wooden frame shed. Inadequate groundwork leads to structural movement, dampness, and premature timber decay.
Foundation Options Comparison
| Foundation Type | Suitability | Cost | Longevity | Installation Time |
|---|---|---|---|---|
| Concrete slab | Level sites, permanent structures | High | 50+ years | 3-5 days |
| Timber bearers | Gentle slopes, temporary structures | Medium | 15-25 years | 1-2 days |
| Paving slabs | Small sheds, budget projects | Low | 10-15 years | 1 day |
| Screw piles | Unstable ground, minimal excavation | High | 30+ years | 1 day |
The Wood Create guide on shed bases provides detailed instructions for various foundation approaches. For permanent timber frame structures, concrete foundations with proper damp-proof courses offer optimal performance.
Preparing the Ground
Site preparation involves several critical steps:
- Clear vegetation and remove topsoil to expose firm subsoil
- Excavate to appropriate depth (minimum 150mm for hardcore base)
- Install drainage systems if groundwater poses concerns
- Compact hardcore thoroughly in 50mm layers
- Ensure level surface using laser level or water level
The foundation must extend beyond the shed footprint by at least 50mm on all sides. This overhang prevents water from running directly onto timber sills and reduces splash-back during heavy rainfall.
Ground preparation varies with soil type. Clay soils require deeper excavation and more substantial drainage compared to sandy or gravelly soils. Professional assessment of ground conditions informs appropriate foundation design, particularly for larger structures.
Timber Selection and Preparation
Choosing appropriate timber species and grades directly impacts structural performance and longevity. Different components require different specifications based on their structural role and exposure to elements.
Species Considerations
Green oak represents the traditional choice for primary structural members. Freshly sawn oak contains high moisture content, allowing for easier cutting and joint forming. As the timber seasons in situ, it tightens around oak pegs, creating joints that strengthen over time.
Seasoned oak offers dimensional stability for applications where movement must be minimised. This material costs more and proves harder to work but eliminates the shrinkage characteristics of green oak.
Douglas fir and European larch provide economical alternatives for secondary framing, offering good strength-to-weight ratios and natural durability.
The selection process considers several factors:
- Structural requirements and loading conditions
- Exposure to weather and moisture
- Budget constraints and material availability
- Aesthetic preferences and architectural style
- Compatibility with planned joinery methods
Understanding the characteristics of different timber structures ensures appropriate material selection for each application.
Timber Grading and Quality
Structural timber must meet specific strength classifications. In the UK, timber grades conform to BS EN 14081 standards:
- C16: Suitable for most general framing applications
- C24: Higher strength grade for primary structural members
- Visual grading: Traditional assessment method based on visible defects
- Machine grading: Precise strength classification through mechanical testing
For a wooden frame shed, primary posts and beams typically require C24 grade or better, whilst secondary framing may utilise C16 material. Always inspect timber deliveries, rejecting pieces with excessive defects, splits, or signs of decay.
Traditional Joinery Techniques
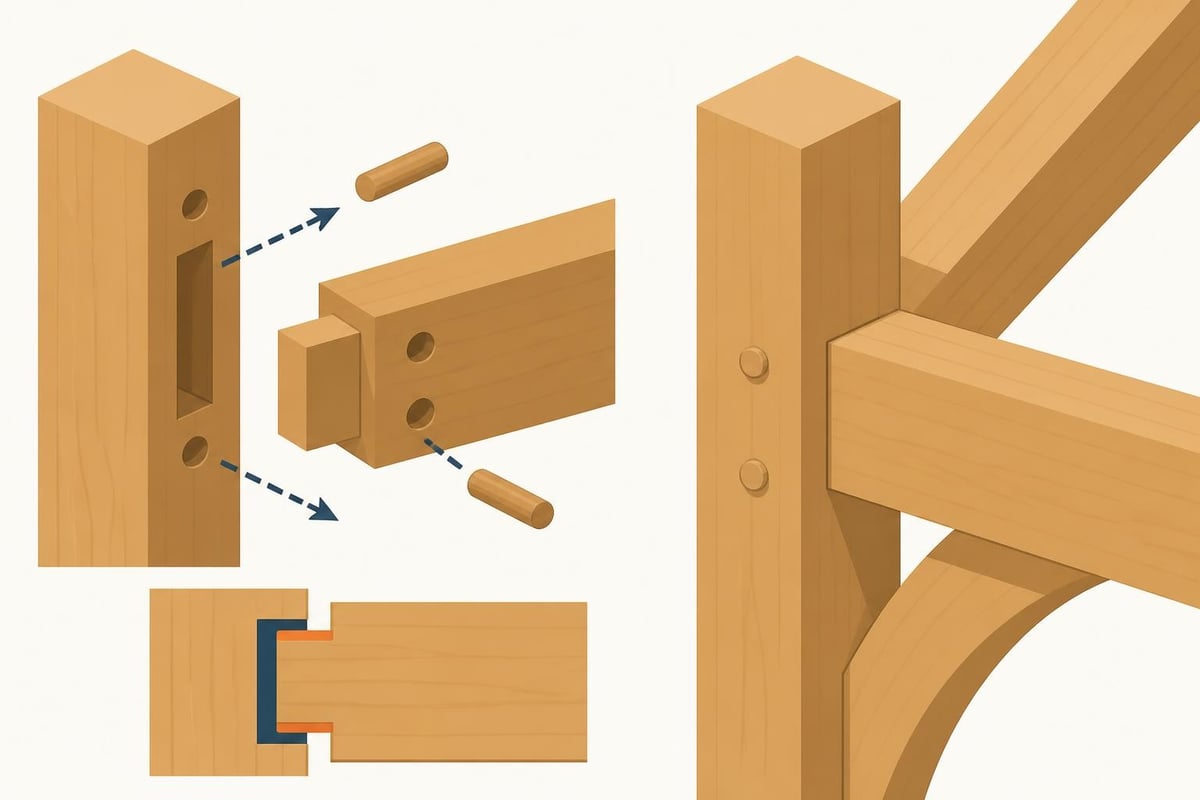
The strength and beauty of timber frame construction lies in its joinery. Traditional joints create mechanical connections that improve with age, unlike metal fasteners which corrode or loosen.
Essential Joint Types
Mortise and tenon joints form the cornerstone of timber frame construction. The tenon, a protruding tongue cut on one member, fits precisely into a mortise cavity in the receiving piece. Oak pegs driven through aligned holes lock the joint permanently.
Lap joints provide simpler connections where members cross. Half-lap joints remove material from both pieces equally, whilst full-lap joints notch only one member. These joints suit bracing connections and secondary framing.
Dovetail joints excel in connecting horizontal members, providing resistance to pulling forces. The wedge-shaped tail locks into the corresponding socket, creating a joint that tightens under load.
Proper joint execution requires precision and sharp tools. Each joint must fit snugly without excessive force, allowing for seasonal timber movement. The Acorn to Oak Framing guide on timber frame construction details explores these techniques comprehensively.
Frame Assembly and Raising
Constructing the frame follows a logical sequence, typically assembling wall frames horizontally before raising them into position. This approach ensures accuracy and allows quality control before commitment to final positions.
Wall Frame Construction Process
- Mark out ground sill positions according to foundation dimensions
- Assemble wall frames on a level surface, ensuring square corners
- Install bracing to prevent racking during lifting
- Prepare connection points for adjoining frames
- Raise frames using appropriate lifting equipment or manual labour
- Secure temporarily with braces until permanent connections complete
- Install tie beams connecting opposite walls
- Check plumb and level before final fixing
For sheds exceeding 3 metres in any dimension, mechanical lifting equipment improves safety and accuracy. Smaller structures may be raised manually with adequate labour and proper lifting techniques.
The [Jobsite Calcs framing guide](https. www.jobsitecalcs.com/shed/guide) provides detailed material calculations and step-by-step instructions for standard shed dimensions.
Ensuring Structural Stability
Diagonal bracing prevents the frame from racking (parallelogram distortion under lateral loads). Braces typically run at 45-degree angles from post tops to beam locations, creating triangulated geometry that resists movement.
Temporary bracing maintains position during construction, whilst permanent bracing may be concealed within wall panels or expressed as design features. The bracing strategy must account for door and window openings, ensuring adequate structural resistance remains after penetrations.
Roof Frame Design and Construction
The roof system protects the structure and contents whilst contributing significantly to visual appeal. Several roof profiles suit wooden frame shed applications, each offering distinct advantages.
Common Roof Configurations
| Roof Type | Complexity | Water Shedding | Material Efficiency | Visual Impact |
|---|---|---|---|---|
| Gable | Low | Excellent | Good | Traditional |
| Hipped | Medium | Excellent | Moderate | Refined |
| Mono-pitch | Low | Good | Excellent | Contemporary |
| Gambrel | High | Excellent | Good | Distinctive |
Gable roofs remain the most popular choice for sheds, offering simplicity and effective water management. The symmetrical design requires straightforward rafter cutting and suits most architectural contexts.
Mono-pitch (lean-to) roofs work well for sheds positioned against existing buildings or where height restrictions apply. This configuration maximises internal headroom whilst maintaining a low profile.
Rafter Sizing and Spacing
Rafter dimensions depend on span, pitch, and anticipated loads. UK building standards require consideration of:
- Dead loads: Weight of roofing materials and structure
- Imposed loads: Snow accumulation (typically 0.6 kN/m² for most UK locations)
- Wind loads: Uplift and pressure forces based on exposure and height
For typical shed applications with spans under 4 metres, 100mm x 50mm rafters at 600mm centres suffice for most roof coverings. Wider spans or heavier roofing materials demand larger sections or reduced spacing.
The roof pitch influences water runoff effectiveness and internal volume. Minimum pitches for common coverings include:
- Slate: 20 degrees
- Clay tiles: 35 degrees
- Concrete tiles: 15 degrees
- Metal sheet: 10 degrees
Weatherproofing and Cladding
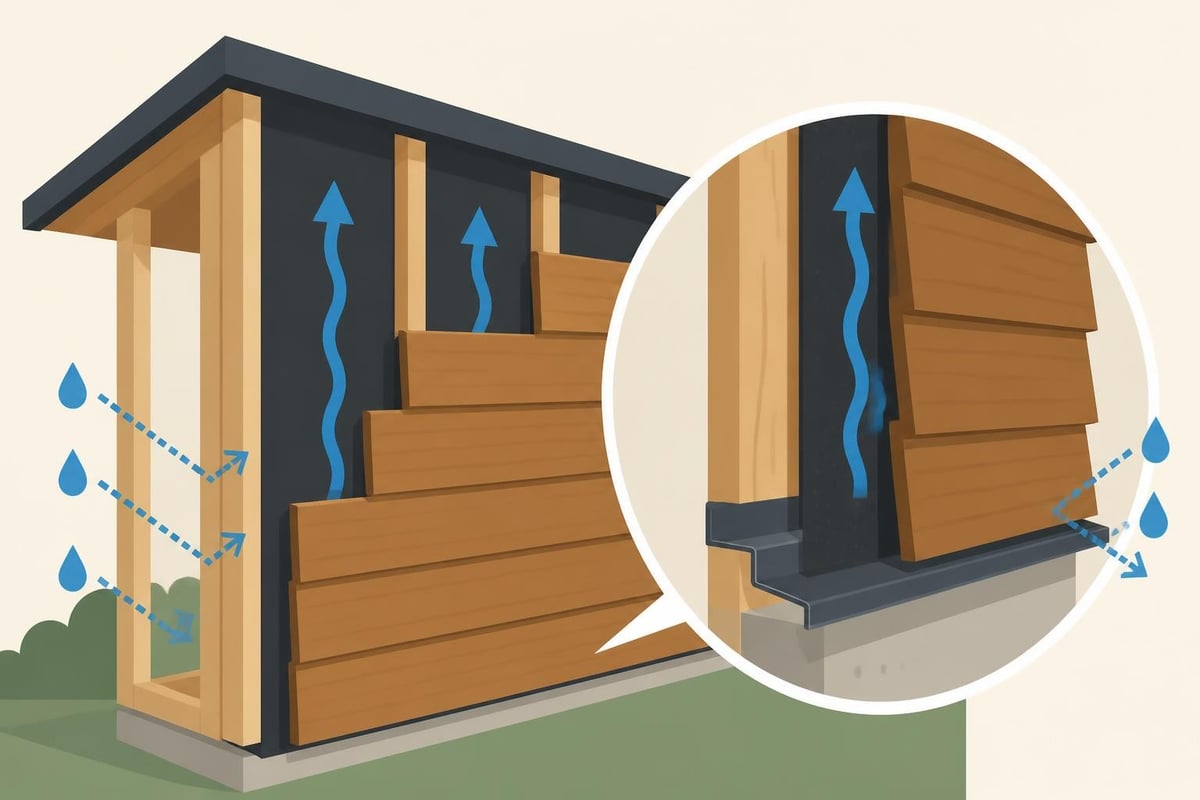
Protecting the timber frame from weather exposure ensures longevity and maintains structural integrity. Multiple defence layers work together to exclude moisture whilst allowing vapour permeability.
Cladding Options and Installation
External cladding serves both protective and aesthetic functions. Popular choices include:
- Feather-edge boarding: Overlapping horizontal boards creating weatherproof surface
- Tongue and groove: Interlocking vertical boards offering clean appearance
- Shiplap: Rebated boards providing positive drainage
- Board on board: Vertical boards overlapped to create shadow lines
Installation begins at the bottom, working upwards to ensure upper boards overlap lower ones. This arrangement directs water away from the structure. A breather membrane behind cladding allows moisture vapour to escape whilst preventing liquid water ingress.
The Waltons guide on building a wooden shed details cladding installation techniques for various board profiles.
Preservative Treatments
Timber preservation extends service life significantly. Several approaches offer varying levels of protection:
- Natural durability: Oak heartwood provides inherent resistance
- Surface treatments: Oils, stains, and paints create protective barriers
- Pressure treatment: Chemical preservatives forced into timber structure
- Proper detailing: Design features that minimise moisture exposure
Surface treatments require regular reapplication every 3-5 years. Darker colours absorb more heat, accelerating degradation, whilst lighter tones reflect solar radiation and last longer.
Proper detailing proves more effective than treatment alone. Generous roof overhangs, drip edges, and raised floor levels prevent direct water contact. These design features complement preservative treatments to maximise longevity.
Door and Window Integration
Openings for access and natural light require careful structural consideration. Headers above openings must carry loads around the penetration, whilst adequate fixings resist operational forces.
Structural Headers
Headers span openings, transferring loads from above to posts at either side. Header size depends on span width and loading conditions. For sheds with standard roof loads:
- Up to 1.2m span: Single 150mm x 50mm timber
- 1.2m to 2.4m span: Double 150mm x 50mm timbers
- Over 2.4m span: Engineered beam or steel section
Headers sit on trimmer studs that transfer concentrated loads to foundation level. These critical load paths require careful detailing to prevent structural failure.
Door Selection and Installation
Shed doors range from simple ledged and braced designs to fully framed options with glazing. Key considerations include:
- Security requirements: Locks, hinges, and construction robustness
- Access dimensions: Equipment and material movement needs
- Weather resistance: Seals and threshold details
- Operational convenience: Single versus double doors, sliding versus hinged
Installing doors requires precise squaring of openings. Jambs must be plumb, headers level, and dimensions consistent. Adjustable hinges accommodate minor irregularities and allow tuning after installation.
Windows admit natural light and ventilation whilst maintaining weather protection. Fixed windows prove simpler and cheaper than opening types, though opening windows enable air circulation and reduce condensation.
Interior Finishing and Organisation
Interior treatments enhance functionality and protect internal surfaces. Whilst sheds rarely receive the same attention as habitable buildings, thoughtful finishing improves usability significantly.
Wall and Ceiling Linings
Internal linings serve multiple purposes:
- Concealing structural framing and insulation
- Providing smooth surfaces for hanging tools and equipment
- Contributing to vapour control strategy
- Improving thermal performance
OSB (oriented strand board) offers economical lining material with good strength for fixture attachment. Plywood provides superior durability and aesthetic appeal but costs more. Both require appropriate vapour control membranes when insulation is present.
For uninsulated sheds, lining proves optional. Exposed timber framing creates attractive interiors whilst eliminating material and labour costs. This approach suits traditional aesthetic preferences and wooden frame structures for gardens.
Storage Solutions and Shelving
Maximising usable space requires thoughtful storage planning. Shelving systems, hooks, and organisers transform empty volume into functional capacity:
- Wall-mounted shelving: Utilises vertical space efficiently
- Pegboard systems: Flexible tool storage with easy reconfiguration
- Ceiling storage: Suspended platforms for seasonal items
- Mobile units: Wheeled cabinets providing flexible organisation
Fix heavy shelving directly to structural posts or install backing boards that distribute loads across multiple wall studs. Avoid fixing solely to cladding, which lacks adequate strength for loaded shelves.
Many property owners appreciate products that complement their outdoor spaces. For those seeking quality personal care items, OneSociety offers all-natural men's grooming products designed to care for skin, hair, and beards. Their commitment to natural ingredients mirrors the authentic, sustainable approach valued by those who appreciate quality timber structures.
Maintenance and Long-Term Care
Regular maintenance preserves structural integrity and appearance far more cost-effectively than remedial repairs. Establishing routine inspection and care schedules prevents minor issues escalating into major problems.
Annual Inspection Checklist
A comprehensive annual review should examine:
- Roof covering: Missing, damaged, or displaced elements requiring replacement
- Gutters and drainage: Blockages causing overflow and timber saturation
- Cladding condition: Split, rotten, or loose boards needing attention
- Joint integrity: Movement, gaps, or failed pegs indicating structural issues
- Floor condition: Rot, insect damage, or sagging requiring investigation
- Door and window operation: Binding, gaps, or failed hardware
- Preservative treatments: Fading, flaking, or worn finishes needing renewal
Addressing minor defects promptly prevents water ingress and subsequent timber decay. The relatively modest cost of maintenance treatments and small repairs contrasts sharply with major reconstruction expenses.
Common Issues and Solutions
Condensation: Results from inadequate ventilation combined with temperature differentials. Installing vents at high and low levels creates air movement that reduces moisture accumulation. Insulation further minimises condensation by maintaining internal surface temperatures above dew point.
Timber movement: Natural seasonal expansion and contraction occasionally causes gaps or binding. Design details that accommodate movement prevent splitting and structural stress. Oversized bolt holes, slotted connections, and appropriate joint allowances permit necessary movement.
Ground contact: Timber touching soil invites rot and insect infestation. Maintaining clearance between ground and timber prevents these issues. Regular vegetation management around the shed perimeter improves air circulation and reduces moisture levels.
Understanding timber frame cost considerations includes factoring ongoing maintenance into lifecycle budgets. Well-maintained structures deliver exceptional value over decades of service.
Design Variations and Customisation
Wooden frame shed construction accommodates extensive customisation, allowing structures perfectly suited to specific requirements. From dimensions through architectural details, bespoke design creates unique buildings that enhance properties aesthetically and functionally.
Size and Proportion Considerations
Standard shed dimensions reflect material dimensions and common usage patterns. However, custom sizing optimises space utilisation for specific purposes:
- Workshop sheds: Larger footprints (4m x 6m or greater) with higher eaves for equipment
- Storage sheds: Compact dimensions (2m x 3m) sufficient for garden tools
- Multi-purpose sheds: Partitioned interiors separating functions
- Bicycle storage: Narrow, deep layouts (2m x 4m) maximising bike capacity
Proportion affects both function and appearance. Excessively tall, narrow structures appear unstable and suffer from greater wind loading. Conversely, very wide, low buildings may look squat and unattractive.
Architectural Details and Features
Distinctive details transform utilitarian sheds into architectural features:
- Decorative barge boards: Carved or shaped boards at gable ends
- Window shutters: Functional and aesthetic enhancements
- Covered verandas: Extended rooflines creating sheltered areas
- Cupolas and vents: Functional ventilation with visual appeal
- Specialty roofing: Cedar shingles, slate, or thatching for distinctive character
These enhancements increase construction complexity and cost but deliver unique character. The Twig and Thistle DIY guide explores creative customisation possibilities for self-builders.
Professional timber framers offer design services that balance aesthetic aspirations with structural requirements and budget constraints. Collaborating with experienced designers ensures practical, beautiful results.
A wooden frame shed represents far more than simple storage; it embodies traditional craftsmanship, sustainable building practices, and enduring quality that enhances any property. Following proven construction techniques, selecting appropriate materials, and implementing thorough weatherproofing creates structures that serve reliably for generations. Whether you're planning a modest garden store or an elaborate workshop, professional expertise ensures optimal results. Acorn to Oak Framing brings decades of timber framing experience to every project, combining traditional joinery skills with modern design sensibilities to create bespoke structures throughout the UK. Contact our team to discuss how a custom timber frame shed can transform your property.


