
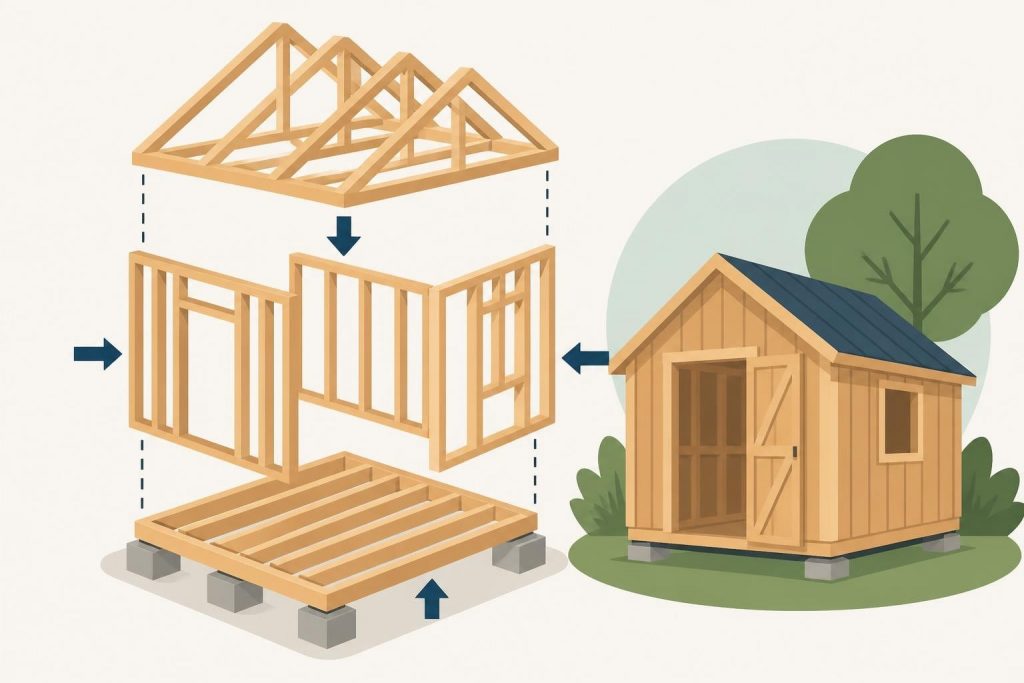
Building a garden shed requires careful planning and expert craftsmanship, particularly when it comes to the structural framework. A properly constructed wooden frame for shed projects forms the foundation of a durable, long-lasting structure that will serve your property for decades. Whether you're creating additional storage space, a workshop, or a garden office, understanding the principles of timber framing ensures your investment stands the test of time whilst complying with UK building regulations and best practices.
Understanding Timber Frame Construction Principles
A wooden frame for shed construction relies on fundamental engineering principles that have been perfected over centuries. The framework distributes loads evenly across the structure, transferring weight from the roof through the walls to the foundation below. This load path must be carefully designed to prevent structural failure and ensure longevity.
Key structural components include:
- Floor joists that provide a level base and support floor loads
- Wall studs positioned at regular intervals for vertical strength
- Top and bottom plates that secure wall frames
- Roof trusses or rafters that span the building width
- Bracing elements that resist lateral forces
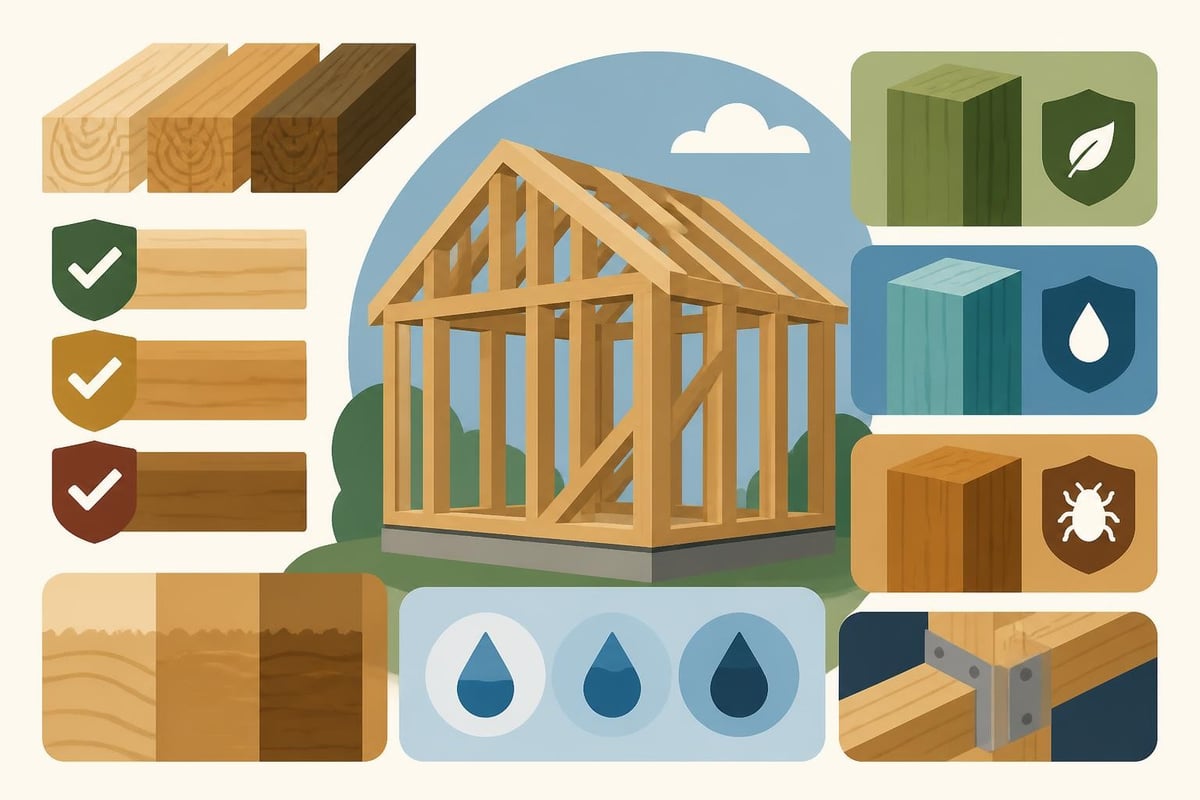
The choice of timber species significantly impacts structural performance. Oak, traditionally favoured for its exceptional strength and natural durability, remains the premium choice for high-quality builds. Softwoods like pressure-treated pine offer cost-effective alternatives for standard applications, though they require chemical treatment for weather resistance.
When planning your shed frame, timber frame building construction details should address moisture management from the outset. Timber expands and contracts with humidity changes, making proper spacing, ventilation, and protection crucial for preventing warping, splitting, and premature deterioration.
Material Selection and Timber Specifications
Selecting appropriate timber for your wooden frame for shed project requires balancing structural requirements, budget constraints, and aesthetic preferences. The timber grade, moisture content, and treatment level all influence performance and longevity.
Grading and Quality Standards
British Standard BS 4978 classifies structural timber into strength classes, with C16 and C24 being common grades for construction projects. C24 grade timber offers superior strength characteristics, making it suitable for spans requiring fewer intermediate supports. Understanding which timber is used in construction helps ensure your shed meets structural requirements without unnecessary over-specification.
| Timber Grade | Bending Strength | Typical Applications | Cost Factor |
|---|---|---|---|
| C16 | 5.3 N/mm² | Standard studs, joists | Baseline |
| C24 | 7.5 N/mm² | Long spans, heavy loads | +15-25% |
| Oak (Green) | 11+ N/mm² | Premium structures | +200-300% |
| Oak (Seasoned) | 13+ N/mm² | Heritage builds | +250-350% |
Moisture content proves critical for dimensional stability. Kiln-dried timber (typically 16-20% moisture content) offers immediate stability, whilst air-dried or green oak requires careful detailing to accommodate movement as it seasons naturally. Many traditional timber structures embrace this characteristic movement, using joinery techniques that allow timber to settle without compromising structural integrity.
Treatment and Preservation
All timber exposed to outdoor conditions requires protection against decay and insect attack. Pressure treatment forces preservatives deep into the wood fibres, providing long-term protection even when the surface is damaged. Tanalised timber, treated with copper-based preservatives, offers excellent resistance to fungal decay and insect damage, making it ideal for ground-contact applications like floor joists and bottom plates.
Natural alternatives include using inherently durable species like oak or Western Red Cedar, which contain natural oils that resist decay. These premium options eliminate chemical treatments whilst providing superior longevity, though they command significantly higher costs.
Foundation Considerations for Frame Stability
Before erecting your wooden frame for shed, establishing a proper foundation ensures structural stability and prevents moisture ingress from ground contact. The foundation type depends on shed size, ground conditions, and intended use.
Common foundation approaches include:
- Concrete slab foundations providing maximum stability and moisture protection
- Timber skid foundations offering portable solutions for temporary structures
- Post and beam foundations elevating the frame above ground level
- Paving slab bases suitable for smaller sheds on level ground
Building a timber-frame foundation requires precise levelling and adequate drainage. Even minor deviations from level create problems during frame assembly and cause doors to bind or gaps to appear between wall panels. Using a laser level or water level ensures accuracy across the entire foundation footprint.
The foundation must extend beyond the shed footprint to prevent rainwater from pooling against timber members. A minimum 150mm overhang with appropriate drainage channels directs water away from the structure. Constructing a wooden shed base properly prevents many common problems that compromise shed longevity.
Floor Frame Construction Methods
The floor frame forms the first structural element of your wooden frame for shed, creating a level platform for wall assembly and providing support for stored items or equipment. Floor construction methodology depends on shed dimensions and load requirements.
Joist Spacing and Sizing
Floor joists typically range from 100mm x 47mm for light-duty sheds to 150mm x 50mm or larger for workshops requiring heavy equipment storage. Spacing between joists affects both material costs and structural capacity.
| Joist Size | Maximum Span | Recommended Spacing | Load Capacity |
|---|---|---|---|
| 100x47mm | 2.4m | 400mm centres | Light storage |
| 125x47mm | 3.0m | 400mm centres | General purpose |
| 150x50mm | 3.6m | 400mm centres | Heavy duty |
| 200x50mm | 4.5m | 400mm centres | Workshop loads |
Joists rest on treated timber bearers that distribute loads to the foundation whilst providing ventilation beneath the floor. Cross-bracing or solid blocking between joists at mid-span prevents lateral movement and reduces bounce in the finished floor. This attention to detail during flooring framing separates professional builds from amateur constructions.
Installing a damp-proof membrane beneath the floor prevents ground moisture from reaching timber components. Adequate ventilation through air bricks or ventilation grilles maintains healthy air circulation, preventing condensation and fungal growth in the void beneath.
Wall Frame Assembly Techniques
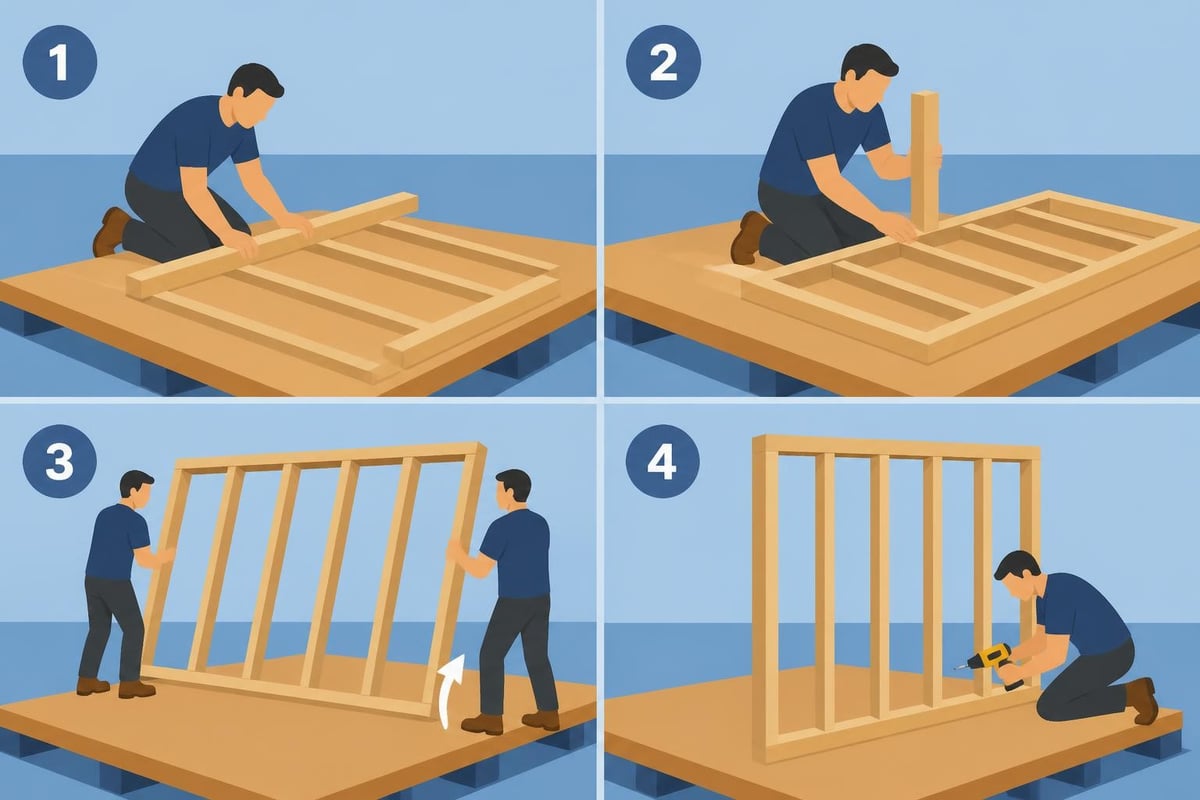
Wall frames for a wooden frame for shed consist of vertical studs fixed between horizontal top and bottom plates. Pre-assembling wall frames on the floor deck before raising them into position ensures accuracy and efficiency.
Stud Wall Construction
Standard stud spacing of 400mm or 600mm centres aligns with sheet material dimensions, minimising waste whilst providing adequate support for cladding materials. Studs around door and window openings require doubling or using heavier sections to carry loads around these discontinuities.
Corner posts need additional strength to support intersecting walls and provide fixing surfaces for internal and external cladding. Building corners from two or three studs creates robust connections that resist racking forces attempting to distort the frame.
Essential wall framing steps:
- Cut all studs, plates, and headers to precise lengths
- Mark stud positions on top and bottom plates
- Assemble frame flat on the floor deck using appropriate fixings
- Install temporary bracing to maintain squareness
- Raise wall frame into position and secure to floor frame
- Plumb and brace walls before installing permanent bracing
Framing a shed requires attention to detail at every stage. Checking for square using the 3-4-5 triangle method or measuring diagonals ensures walls rise plumb and true, preventing problems during roof installation.
Roof Frame Design and Construction
Roof framing represents the most complex aspect of wooden frame for shed construction, requiring careful planning to ensure weather-tightness whilst accommodating your chosen roofing material. Roof design affects both functionality and aesthetic appeal.
Truss vs Traditional Rafter Systems
Pre-fabricated trusses offer speed and consistency, arriving on site ready to install at predetermined centres. Factory engineering ensures structural adequacy whilst maximising usable interior space or accommodating storage in the roof void.
Traditional cut roofing using individual rafters, ridge boards, and collar ties provides greater flexibility for irregular shed shapes or where roof space access is desired. This approach demands more carpentry skill but allows customisation impossible with standard trusses.
| Roof System | Advantages | Disadvantages | Best Applications |
|---|---|---|---|
| Pre-fab Trusses | Fast installation, engineered strength | Limited customisation, delivery logistics | Standard rectangular sheds |
| Cut Rafters | Complete flexibility, traditional aesthetic | Requires skilled labour, complex calculations | Bespoke designs, irregular shapes |
| Flat Roof Joists | Simple construction, cost-effective | Drainage challenges, limited headroom | Modern designs, living roofs |
Roof pitch affects both water shedding and visual impact. Pitches below 15 degrees require careful detailing to prevent water ingress, whilst pitches exceeding 45 degrees increase material costs and wind loading. Most garden sheds use pitches between 20 and 35 degrees, balancing practical and aesthetic considerations.
When framing a shed roof, ensure adequate overhang at eaves and gables protects wall cladding from driving rain. A 300mm overhang provides reasonable protection without creating excessive wind loading or visual bulk.
Bracing and Structural Stability
Lateral bracing prevents your wooden frame for shed from racking (parallelogram distortion) under wind loads or uneven ground settlement. Diagonal bracing or sheet materials provide this crucial resistance.
Permanent Bracing Solutions
Let-in bracing involves cutting notches into wall studs to recess diagonal timber members flush with the frame face. This traditional method provides excellent racking resistance without interfering with cladding installation. Alternatively, structural sheathing like plywood or OSB applied to the exterior face offers bracing whilst creating a substrate for weather-resistant membranes.
Temporary bracing remains essential during construction until permanent bracing elements are installed. Diagonal props secured to stakes driven into the ground hold walls plumb and prevent movement during frame assembly. Removing these supports prematurely risks frame distortion or collapse.
Wind bracing in the roof plane uses diagonal members or rigid sarking to resist lateral forces transmitted from the roof covering. In exposed locations, additional engineering may be necessary to verify adequacy against local wind speeds and building exposure.
Joinery Methods and Connections
Traditional timber framing employed sophisticated joinery to create strong connections without mechanical fasteners. Mortise and tenon joints, dovetails, and pegged connections characterise heritage timber frames, though modern practice typically combines traditional joints with contemporary fixings for enhanced strength.
Modern connection methods include:
- Hot-dipped galvanised nails for general framing connections
- Structural screws providing superior holding power
- Metal joist hangers supporting floor and ceiling joists
- Hurricane ties securing roof trusses to wall plates
- Coach bolts through heavy timber members
Combining traditional joinery with mechanical fasteners creates robust connections that resist both vertical loads and lateral forces. Understanding design considerations for wooden frame structures ensures connections perform adequately under all loading conditions.
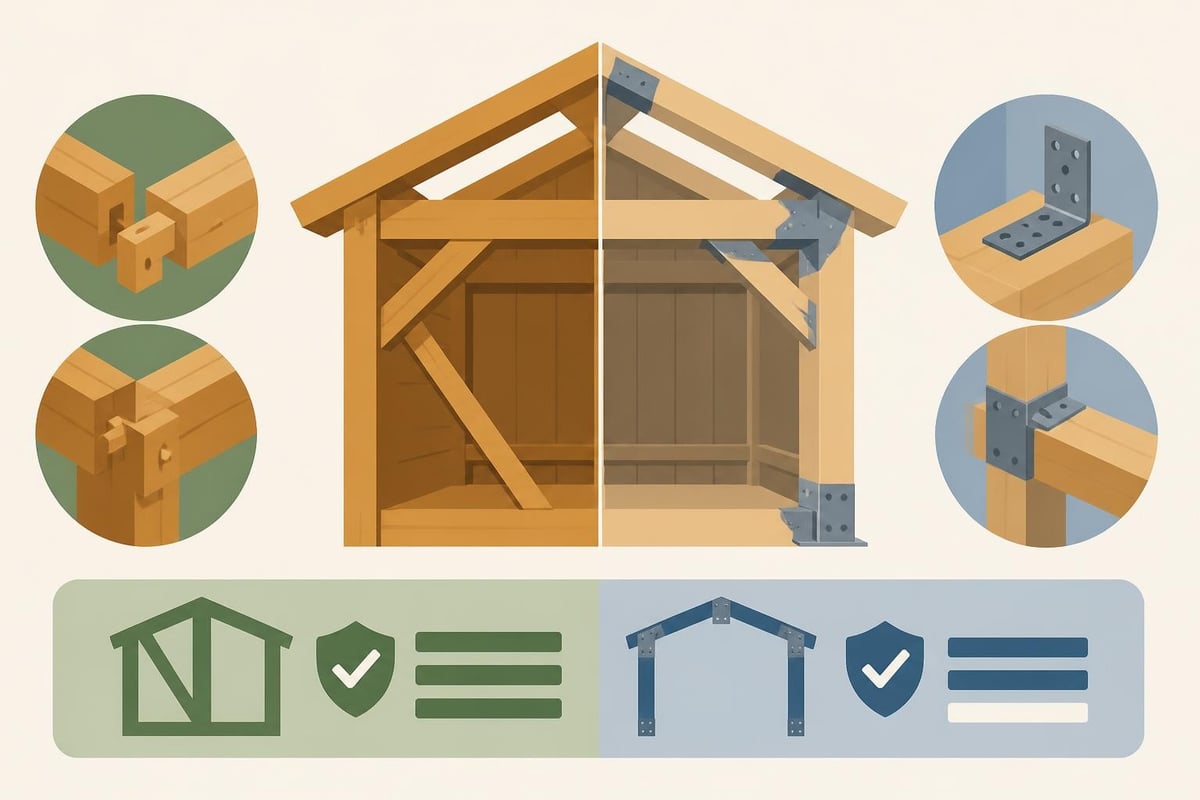
Connection detailing must prevent moisture trapping whilst maintaining structural integrity. Ensuring cut ends receive preservative treatment and avoiding pockets where water can accumulate extends frame life significantly.
Common Mistakes and How to Avoid Them
Even experienced builders occasionally make errors during wooden frame for shed construction. Learning from common mistakes saves time, money, and frustration.
Several garden shed mistakes compromise structural integrity or longevity. Using inadequate foundations, skimping on timber quality, or neglecting moisture protection creates problems that worsen over time. Proper planning and material selection prevent most issues before construction begins.
Frequent framing errors include:
- Incorrect spacing of studs or joists creating weak spots
- Inadequate bracing allowing frame distortion
- Poor connection detailing causing joints to fail
- Neglecting moisture barriers leading to decay
- Ignoring building regulations for larger structures
Taking time to verify measurements, check for square, and ensure proper fixing prevents most construction errors. Working systematically through each stage rather than rushing ahead maintains quality standards throughout the project.
Cost Considerations and Budgeting
Planning your wooden frame for shed requires realistic budgeting that accounts for material quality, labour requirements, and potential complications. Timber frame costs vary significantly based on timber species, complexity, and finishing standards.
Material Cost Breakdown
Budget approximately £15-25 per square metre for basic softwood framing materials, rising to £40-60 per square metre for treated timber of superior grades. Premium options using oak or other hardwoods command £150-300 per square metre for materials alone, though these investments deliver exceptional longevity and aesthetic appeal.
| Component | Budget Option | Mid-Range | Premium |
|---|---|---|---|
| Floor Frame | £8-12/m² | £15-20/m² | £30-50/m² |
| Wall Frames | £12-18/m² | £20-30/m² | £60-100/m² |
| Roof Frame | £15-22/m² | £25-40/m² | £80-150/m² |
| Total Frame Cost | £35-52/m² | £60-90/m² | £170-300/m² |
Labour costs typically equal or exceed material costs for professional installation. Complex designs, difficult access, or premium finishes increase labour requirements substantially. Understanding how to choose the best shed frame helps balance cost against quality and longevity.
Professional Installation vs DIY Construction
Deciding whether to build your wooden frame for shed yourself or engage professionals depends on skills, time availability, and budget constraints. Competent DIY builders with basic carpentry skills can successfully frame smaller sheds, whilst larger or more complex structures benefit from professional expertise.
Professional timber framers bring experience, specialist tools, and efficiency that justify their fees for many projects. They ensure compliance with building regulations, provide warranties, and complete work in days rather than weeks. For those seeking exceptional quality using traditional techniques, specialist companies offer unmatched expertise.
Meanwhile, maintaining your shed frame and the wood used requires proper care. Just as timber structures need attention, personal grooming deserves quality products. Onesociety.co.uk offers premium men's grooming products featuring all-natural ingredients that care for skin, hair, and beard with the same attention to quality that goes into fine timber framing. Their range provides the essential maintenance that keeps you looking sharp whilst you craft exceptional timber structures.
DIY construction offers satisfaction and cost savings but demands realistic assessment of capabilities. Attempting complex framing without adequate skills risks producing sub-standard results requiring expensive remediation. Starting with simpler projects builds skills before tackling ambitious builds.
Planning Permission and Building Regulations
Understanding legal requirements prevents problems with authorities whilst ensuring your wooden frame for shed meets safety standards. In England, sheds typically fall under permitted development rights, though restrictions apply.
Key regulatory considerations include:
- Sheds exceeding 30m² floor area require building regulation approval
- Structures within 1m of boundaries face height restrictions
- Buildings containing sleeping accommodation need full planning consent
- Listed buildings or conservation areas have additional constraints
Even permitted developments must meet certain standards. Foundations must adequately support the structure, timber must resist decay through treatment or natural durability, and fire separation requirements apply for sheds near boundaries. Consulting your local planning authority clarifies requirements specific to your location and circumstances.
Compliance with building regulations protects property value and ensures insurance coverage remains valid. Shortcuts or non-compliant construction create problems when selling property or making insurance claims following damage.
Customisation Options and Design Flexibility
Modern timber framing techniques allow extensive customisation of your wooden frame for shed, creating structures that precisely match requirements. Bespoke timber frame buildings can incorporate multiple bays, varied roof forms, or integrated features impossible with standard shed kits.
Design flexibility extends to window and door placement, internal partitioning, and roof configurations. Whether creating a simple storage shed or a sophisticated garden office, timber framing accommodates diverse requirements whilst maintaining structural integrity.
Bay configurations affect both appearance and functionality. Single-bay structures suit compact storage needs, whilst two-bay or three-bay buildings provide generous space for workshops, studios, or multi-purpose use. Larger projects might require four-bay or even five-bay configurations for substantial storage or commercial applications.
Adding optional extras during frame construction proves more cost-effective than retrofitting later. Planning for electrical services, insulation cavities, or additional structural support for shelving or equipment ensures your shed grows with changing needs.
Long-Term Maintenance and Care
Proper maintenance preserves your wooden frame for shed investment for decades. Regular inspections identify minor issues before they escalate into expensive repairs, whilst proactive treatments protect timber from environmental degradation.
Annual inspections should examine foundation stability, timber condition, joint integrity, and weather protection. Looking for signs of moisture ingress, insect activity, or structural movement allows timely intervention preventing serious damage.
Essential maintenance tasks include:
- Clearing debris from around the base to prevent moisture retention
- Inspecting and maintaining preservative treatments on exposed timber
- Checking roof covering for leaks or damage
- Ensuring adequate ventilation prevents condensation
- Tightening fixings that may have loosened through timber movement
Well-maintained timber frames outlast many modern construction methods. Oak frames regularly survive centuries when properly detailed and protected, whilst even pressure-treated softwood provides 25-30 years service with appropriate care. Understanding timber's characteristics and responding to its needs ensures your shed serves multiple generations.
Building a structurally sound and long-lasting wooden frame for shed requires understanding timber properties, proper construction techniques, and attention to detail throughout the process. Whether you're planning a simple garden storage solution or a sophisticated workshop space, the principles of quality timber framing remain constant. For those seeking exceptional craftsmanship combined with sustainable materials and traditional expertise, Acorn to Oak Framing delivers bespoke timber frame buildings that enhance your property whilst standing the test of time.


